In our recent post, we talked about the 8d problem-solving process. As we discussed in that article there are some great problem-solving tools available.
But how do you prevent those issues in the first place?
The need for a Control Plan
All too often you see problems being created from a lack of adherence to process. Or that the process is wrong but people charge blindly on. And the output is either scrap or something that requires extensive rework.
Process control is one of the most important factors in managing both cost and Quality. If you’ve got your process right? That’s 3/4 of the battle.
But just how do you manage process control? It goes without saying that you can’t afford to scrap products mid-process and start again, the impact on both cost and schedule would end up being astronomical.
So what do you do instead?
That’s right, you control the process building in steps that validate/verify the production at a pace that works and protects the work in progress.
As with many of the problem-solving tools that we’ve discussed here on this site they are centered around capturing deviations to the plan and then deploying appropriate remedies.
One of the challenges that businesses face with these methodologies is maintaining the fix over the long term.
This is where the control plan comes in.
The purpose of the control plan is to control the process and reduce the opportunity for deviation.
Control plans are used in industry in everything from automotive to healthcare. They are a widely adopted method of ensuring that the process produces the output required to the right quality.
What does a Control Plan do
The Control Plan is usually in the form of a document it is used to:
Describe the process setups and control activity to assess the product during it’s “manufacture” and ensure it complies with the required output.
This assessment could be done through measurement, inspection, quality checks or other appropriate processes.
The control plan usually follows the “product” during the “manufacturing” process.
Control plans are not set in stone and by their very nature should be reviewed and updated regularly (especially in cases where the output changes i.e. a design update happens).
Hopefully, from this brief introduction you can see that control plans have various benefits not least in that they capture deviations at an early stage and help protect the output.
One key advantage of this method is that it forces the organization to focus on what’s important during the manufacturing process. This helps to eradicate waste/rework and maximize the chances of the customer getting thier product right first time.
As in all good processes the control plan is normally created and reviewed by a cross-functional team – this helps to gain more inputs and greater visibility in terms of the process steps and controls that matter the most.
As a result of the cross-functional team approach the data for the plan can come from a variety of sources however it’s usually a co-ordinator’s role (often a member of the Quality team) that finalizes the plan.
Finally, as we described above Control plans are not set in stone and can be adapted following their launch. Once deployed, the team should encourage participation and feedback to hone and develop the form to ensure it’s optimized and works for all concerned.
How to create a control plan template in excel
Ok so let’s look at how we create the template.
Creating a control plan is really simple, and whilst we’ve done this template in Excel you can easily use Word or something similar.
There’s no funky formulae’s in this template so you just need some basic table creation and formatting skills (in particular merging cells!). We’ve included some screenshots showing you the rows and columns so you can see how we’ve scaled it.
Here’s a screenshot of the finished template (note: only the first process step is completed to give you an idea of how to use the form).
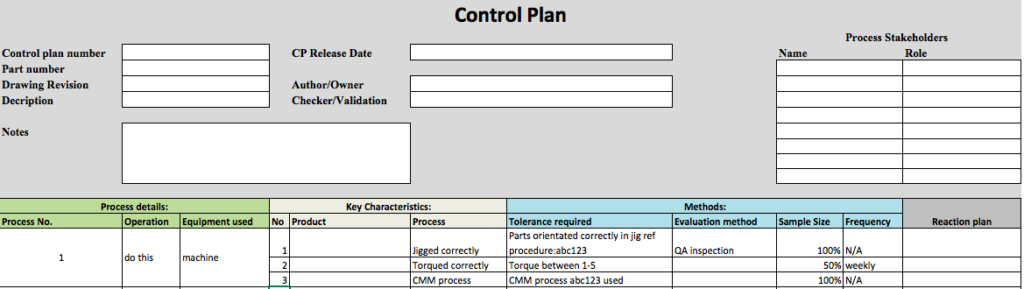
The Control Plan Template is split into 4 sections
As ever, a quick look online will show you that there are a variety of different formats for control plans. They are all based on a common theme. The example below is what’s worked for me, as ever with this form of template feel free to edit it around your requirements while keeping the basic sections (which define the method).
Section 1 – Control Plan Header
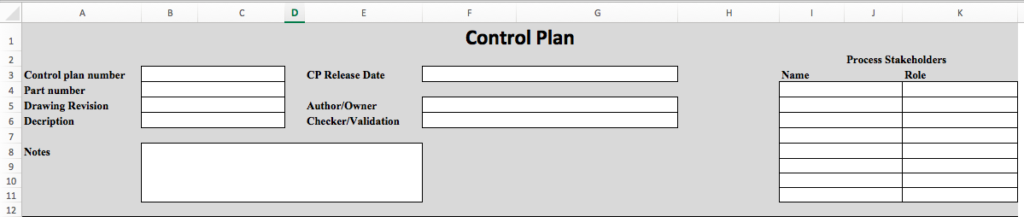
The header includes the information regarding the process being monitored, this includes some generic information around the reference number of the control plan, the details around the product/part being monitored, in particular, it’s drawing revision number (so you can ensure the control plan is relevant to that revision of the part).
There is a release date for the plan coupled with details around the author of the control plan and the individual that validated it.
Finally, the Header includes a list of stakeholders in the process.
Sections 2-5 are basically one table but It’s worth splitting them out into 4 elements so that we can discuss their purpose and how to utilize each field
Section 2 – Control Plan – Process details
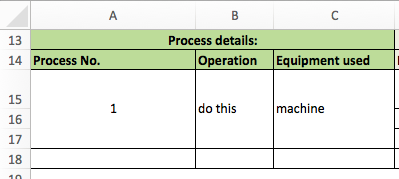
This section lists the process steps, the operation undertaken and what equipment is used. You would expect each of these to be populated.
Section 3 – Control Plan Characteristics
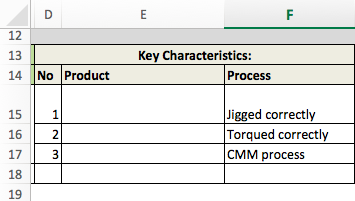
This section details the characteristics of that process step. You may have more than 1 characteristic pertaining to that process step. In the control plan, we list out each characteristic.
Section 4 – Control-plan-Methods

This section describes for each characteristic from section 3 what tolerance is required (define the acceptable condition) and then describes methods to evaluate that method together with the sample size and frequency of check.
For example, with one characteristic you may check each unit in production, for other characteristics you might check 10% etc.
Defining the acceptance criteria and the methods used to measure it is the key role of the control plan
Section 5 – Control Plan – Reaction plan
Section 5, which is a single text entry field, is used to describe the process in the event that an out of tolerance condition is recorded against a characteristic, for example, you may ‘scrap’ the part, you might put it forward for rework. Whatever the option this field describes the process to be followed in the event of a failure.
And that’s it a basic control plan. We hope you found this useful if you have any feedback or questions we’d love to hear from you in our comments section below.