One of the things that excel is particularly great at is in creating templates that you can then reuse time and time again.
While there are a plethora of templates that you can look at downloading, for me there’s nothing like creating your own as it offers an avenue to learning about Excel along the way.
Luckily producing an invoice template in Microsoft Excel is not overly difficult and only requires a working knowledge of the product including a level of formatting knowledge.
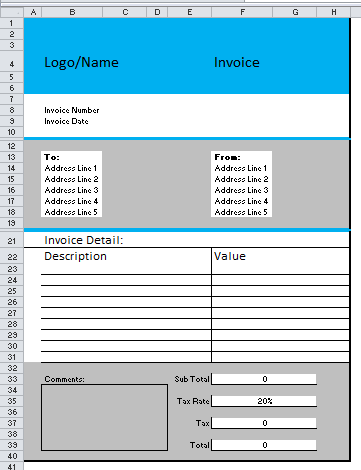
Here’s an image of the Invoice you’ll produce by following these steps:

Instructions on how to create a simple Invoice template
Step 1 requires you to consider the elements that make up an invoice and then review how you’ll implement them on the worksheet – as ever when you’re producing this kind of thing you need to think of the following:
a) What information do I want to present on the template
b) are there any special formatting conditions I need to apply
c) are there any “company standards” i.e. logo / colors that I need to think about.
In terms of creating a simple invoice template we’ll cover:
* How you’ll apply Formatting to the template i.e.borders, sizing, colors, numbers etc.
* What simple formulas you can use to help display subtotals and totals
* What number Formatting you can use
* Saving the spreadsheet for future use as a template.
In our example we divide the template up into 5 main areas and we’ll cover each of these in detail to show how they are constructed, they are:
1/ Company Name and branding
2/ Invoice Address details
3/ Items and values
4/ Totals
5/ Additional comment area
Now before we start, let me just state that the way I’ll go about this is my way – you may have shortcuts or other methods and that’s great, but I’ll create this template my way so please no “why didnt’ you do it like this….” in the comments below please 🙂
So…..let’s get to it.
1/ Company Name and branding
Firstly let’s create a new workbook to get started.
Click on File, New Workbook.
In my example, I’m using Column A to H and Rows 1 to 40 for the size of the template.
For the first 6 rows (A1:H6) I block out with a particular color using the fill color tool of the main menu bar, this creates a rectangle that you can use for your companies branding. There’s plenty of free space that you can use to add a logo or text of your choosing. In my example template, I’m using a blue color scheme.
In Cell F4 I enter the Text “Invoice”. I set the font size for this at 24. This is the document title. In my example I’ve used B4 to enter the text “Logo/Name”, if you’re using this for real I’d suggest that you use your company logo / name in this area.
Under this Logo Area in cell B8 I enter the text “Invoice Number” and in B9 I enter the text “Invoice Date”. There is plenty of free area to enter the respective values to the right of these cells at a later date when the template is being filled out.
2/ Invoice Address details
Row 11 from A11:H11 I block out in the same color I used for the logo area but I reduce the column height to give the effect of a thin bar of color stretching accross the page. I repeat this for Row 20.
I then block out A12 to H19 and use the fill tool to color the area Grey.
In B13 I enter the text “To:”
Then B14-B18 I enter the text:
Address Line 1
Address Line 2
Address Line 3
Address Line 4
Address Line 5
The above text refers to the address you’ll enter of the person/company receiving the invoice. I then use the color fill tool to turn the area B13:B18 White.
In F13 I enter the text “From:”
Then in F14-F18 I enter the address of my company or whoever is issuing the invoice. Once again I turn F13:F18 White.
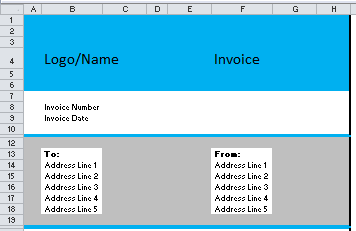
If you’ve followed the above steps correctly you’ll end up with something that looks like this:

3/ Items and values
In Cell B:21 I enter the text “Invoice Detail”
In Cell B:22 I enter the text “Description”
In Cell F:22 I enter the text “Value”
For the above I set the Font size to 18.
I then merge cells B23:E23 and repeat this below to include up to Row 31.
I do the same thing in merging cells F23:G23 and again repeat up to Row 31
Using Excels Borders feature I then create a grid / box below that allows the user to enter descriptions and values for the items being entered on the invoice.
4/ Totals
For A32:H40 I color in Grey
I merge the following cells
F33:G33 and enter the formula “=SUM(F23:G31)”
F35:G35 and enter my prevailing tax rate. In this example I enter 20%
F37:G37 and enter the formula “=F33*F35”
F39:G39 and enter the formula “=F33+F37”
I color each of these resultant cells white using the fill tool.
In cell E33 I enter the text : Sub Total
In cell E35 I enter the text : Tax Rate
In cell E37 I enter the text : Tax
In cell E39 I enter the text: Total
5/ Additional comment area
In cell B33 I enter the text “Comments:”
I then Merge cells B34:D39. This effectively creates a block that you can use to enter additional comments regarding the invoice – for example payment terms, specific comments relating to the customer or other.
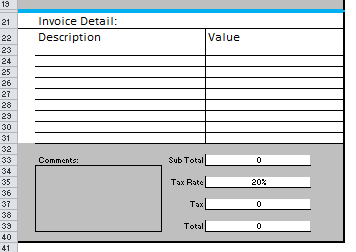
If you’ve followed the steps correctly the bottom half of the invoice should look like this:

Finalising the Excel Invoice template
I then set the print area by selecting the cells I want to appear on the printed version (in my case A1:H40) and then select the “set Print area” option (in my case this was in the Page Layout menu option.
In the File / Page Setup menu option in the margin option, I select to center on page both Horizontally or Vertically.
I then save my document as a Excel Template using the File Save As menu option.
And there you have it. A simple but useful Excel Invoice template.