Today I’m going to show you exactly how to create an awesome Kaizen Idea template in Excel.
Identifying, reviewing and acting on improvement opportunities is one of the fundamentals of Continuous improvement.
There is always room to improve the efficiency and effectiveness of a process.
And having a process to capture and process ideas, to do that, is a must.
Of course, there are different methods, some might use a Kaizen board where ideas are captured, others may use a form and associated workflow.
(If you’re looking for further information on building a system the team over at Triaster show there is a well-trodden path in terms of building continuous improvement process.)
Encouraging your team to make improvement suggestions is a tried and tested method of both fostering a team approach and also encouraging those who are aware of the detail of the process and how to improve it. If you’re doing this using a template to capture the suggestions is a must
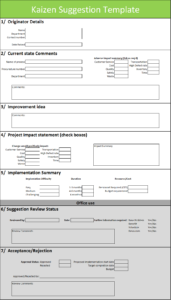
Here’s a screen shot of the finished template we’re going to show you how to create:
(Click this link for a PDF version Kaizen improvement form.pdf)
Before we get into the actual how to, let’s just cover a little bit of the basics regarding Kaizen cards.
As discussed earlier, there are various ways of getting the shop floor to contribute to process improvement ideas, perhaps as part of a kaizen event or perhaps as part of regular team reviews, whatever the forum having the ability to formally capture the idea and then be able to process/review it provides numerous advantages.
Above you’ve seen our template that we created to capture process improvement ideas.
We call this a Kaizen Card – or Kaizen improvement suggestion template.
Kaizen cards are typically improvement ideas captured onto a form or template that can then be used to “manage” the improvement idea.
Kaizen cards are typically improvement ideas captured onto a form or template that can then be used to “manage” the improvement idea.
Kaizen cards don’t have to be complicated, indeed they can just consist of 4 sections
1/ Problem
2/ Opportunity
3/ Benefit
4/ Approved Yes/No
Most businesses will have some variation on this theme. I find it’s good to strike a balance between making the form easy and gathering information that’s useful to the process.
But why have a capture method in the first place? Well, the importance of having them is that:
a) the idea doesn’t get the chance to be forgotten about
b) You have a record of the opportunity so that it can be reviewed
c) you can use the card to assess the benefit and impact
d) you can use it with a workflow system to gain approval to implement.
While we’ve called ours a Kaizen template it could as easily be called an improvement card or a process ideas form, the title doesn’t matter per se but the process of doing it does.
We’ve broken our kaizen card template into 7 sections
1/ The originator’s details
2/ Problem statement / Opportunity Identification (There’s some debate amongst improvement professionals around whether you should identify it as a problem or an opportunity (for more go read the excellent Mark Graban’s post here).
3/ Improvement idea
4/ Impact statement
5/ Implementation Summary
6/ Review status
7/ Idea Acceptance/Rejection
Now whilst the above template is a little more complicated than the 4 sections we described earlier in this post it’s something that we’ve used over time that’s evolved and worked for us. You may want to make your own amendments as you go but use the base principle. Specifically sections 6 & 7 which are the sections for reviewing the opportunity we’ve found useful as it enables us to keep everything on one form but you may want to separate that out onto something else -that’s a personal choice.
We created the form in Excel, so let’s cover how we did that, what information we’ll capture and how we intend to use it. In the How to below, we’ve included plenty of screenshots so you can see what data’s gone into what cell, column, row. This should allow you to easily replicate what we’ve done.
There’s no fancy formulae’s here it’s just text entry and formatting so you only need a modicum of basic Excel to produce it.
OK – let’s get to it.
The Header
For the header, it’s just a merged section of cells (in this case A1:L5) Filled with a Green Color and a White Font at Size 40. I like the style that this gives, now if you’ve got a company logo or standard design this can go here too.
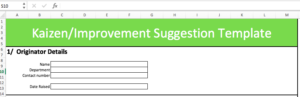
Section 1 – Originator Details
This section is designed to capture the details of the individual who has captured the improvement idea originally, so I just create a bunch of fields using cells containing text and then use the borders tool to create a rectangle box.
Here I create fields for the following:
Name, Department, Contact Number and Date raised (to capture the date the original improvement idea was suggested.
Section 2 Problem/Opportunity definition

As we discussed above there’s plenty of dialogue on whether you should capture issues or opportunities (I’ll leave that to you).
I’ve geared this section around 3 parts and its designed to capture
What’s the process?
What’s wrong with it?
Additional User input
a) the process details – here I create capture fields (using text and cell borders as before) for Process Name, Process Number, Department. Of course, it goes without saying that this works well when you’ve got documented processes but where you don’t you may not have a process number for example so you might need to develop this to suit your business.
b) Impact Summary – I find that a summary of the issue impact is useful. I’ve created a series of checkboxes that the user can use to articulate the area of the issue (or opportunity). I’ve seen other similar forms use things like the 7 wastes model in sections like this, I’ve deviated from that slightly but again it’s down to personal choice.
c) Comments section: Again I’ve just used borders around a selection of cells that allow the user to enter any additional comments they feel are pertinent.
Section 3 The improvement idea
The section just uses a group of cells with a border and allows the user to enter free text to describe their improvement idea.
Section 4 The Project Impact Statement
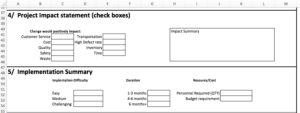
This section describes the expected impact of implementing the improvement.
There are many ways of doing this. For example, you could articulate a cost impact or perhaps a customer service impact or in a % right first time impact. There are many MANY ways!! For it to work best in your organization, consider your audience. What facts and figures get people bought into a project, how can you use them on this form.
In this template, I’ve split this section into 2.
Firstly a checklist which the user can tick if they feel the improvement will benefit a particular function/metric (note this doesn’t quantify anything it just says the “project” will improve that area.)
Secondly, I’ve provided a free text box (cell area with borders) that allows the user to enter free text to articulate the benefit.
Note, I’ve excluded references to financial impact here. I’ve done this as quite often I’ve found individuals populating these forms may not be aware of the appropriate numbers and can “guess” leading to issues later on.
Section 5 Implementation Summary
This section attempts to capture how the project would be implemented, how hard it would be, how long it would take and a rough idea of resource requirement and cost.
I’ve found capturing data like this vitally important in helping businesses prioritize improvement ideas and projects. The view is that hard projects, requiring lots of resources that take ages to implement and provide only marginal benefit need to be easily contrasted with those projects that are easy to do require minimal personnel and could be done in a week or two.
Once again I’ve used text and cells with borders to create a checkbox style section.
The next two sections I’ve described as “Office use”. I’ve assumed there’s some type of workflow where user A completes the form and submits to someone in authority for approval.
Approval workflow tends to differ from one business to another so again you may want to develop these areas to match how your business works. My template implies a check over 2 levels (one to initially peer review the proposal and another to actually approve it).
Section 6 Suggestion Review Status
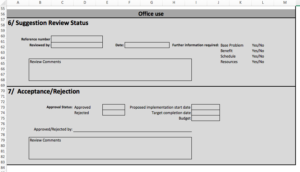
This section captures some information around the peer review and captures areas where further information may be required
Section 7
This section deals with whether the improvement idea is accepted or rejected, it proposes some summary information about the project (start date, completion date & budget) and allows for authorization comments.
Summary
So there you have it, how to create a rudimentary Kaizen/Improvement Suggestion template in Microsoft Excel. Have questions or ideas of your own – we’d love to hear your feedback in our comments section below.