
As you know if you’re a regular reader of this site we love problem-solving. We’ve written about it quite a bit, we’ve covered problem-solving tools and templates like our FMEA template, 5 why template.
For us, Problem-solving is a key business enabler. Successful businesses have systems and processes that help catch, contain and resolve issues that emerge.
It’s all too easy to go like a bull in a china shop at problems, perhaps through a gut feel of what needs to be done – but invariably this does not drive adequate solutions, however, structured processes do.
An intrinsic part of many processes is the documents/forms that are used within it. In this post we’ll take a look at how to create a Root Cause Analysis template, this tool can be used as part of your problem-solving armory and is designed to help capture the issue and follow a series of steps to help determine and document a root cause.
So let’s get stuck in!
What is a root cause analysis template and why should I use it?
What is it?
Root cause analysis is a methodical approach that aims to identify the root cause(s) of a given problem. The key aim is to inform the business which then drives the prevention and recurrence rather than just helping to put the current fire out.
This is important to understand, many problem-solving tools resolve the issue without focusing on irradicating recurrence of the issue. Identifying the root causes helps you place countermeasures in place that target no only the short term resolution but the removal of the cause (and therefore the issue) in its entirety.
But why spend your time doing this? Well, if you don’t prevent recurrence then the problem is likely to rear it’s head again and again and again. This can swallow up costs and resources that could be better spent elsewhere. So it’s really in your interest to understand the cause of the issue and manage it out.
Root causes analysis usually takes several steps these are:
1/ Determine the what (what’s gone on)
2/ Determine the why (why has it happened)
3/ Implement steps or a process to remove the why
Remember in many cases it’s unlikely that there is one big bad. It’s quite possible that there is several contributory factors which have led to the issue. these can usually be categorized as:
- Physical causes, e.g. tooling errors producing an incorrectly manufactured part
- Human causes e.g an employee not following a given process that results in errors being introduced
- Organizational causes – A process that is not optimal and introduces errors.
Understanding these factors can help considerably when you’re designing your Root Cause template, if you design it around your process (considering the steps you need to follow) then it will stand a good chance of being useful.
There are some tried and trusted methods for determining root cause that can be adopted into any template that you utilize for example you may wish to utilize the 5 why technique.
Ok so we’ve covered some of the basics, let’s look at how to create our template.
Designing a Root Causes Analysis Template
As we discussed above, when you’re looking to build a root cause analysis template it’s important to consider the various steps in the process, so that you can build the appropriate parts
When we looked at constructing ours we went for the following elements
- Header
- Issue statement / Impact statement
- Who did what & how
- the current state (with the problem in it) and how it should look in a “should be” state
- a 5 Why review (we’ve used this as our main root cause tool
- an assessment of probable causes
- A root cause(s) statement/confirmation
- Next steps
We felt that this format met the process flow required and also provided the business evidence that the issue had been appropriately reviewed ahead of any fix being deployed
We’re going to be building our template as a form in Excel. (Note you could use Word or other to create it also but we have a personal preference for producing this type of template in Excel – your choice may differ!!)
As with a lot of our Excel-based templates that we’ve shown you how to create you don’t need to be a formulae guru you just need to know your way around formatting in excel.
We’ve predominantly used borders & fill tools to create the fields required.
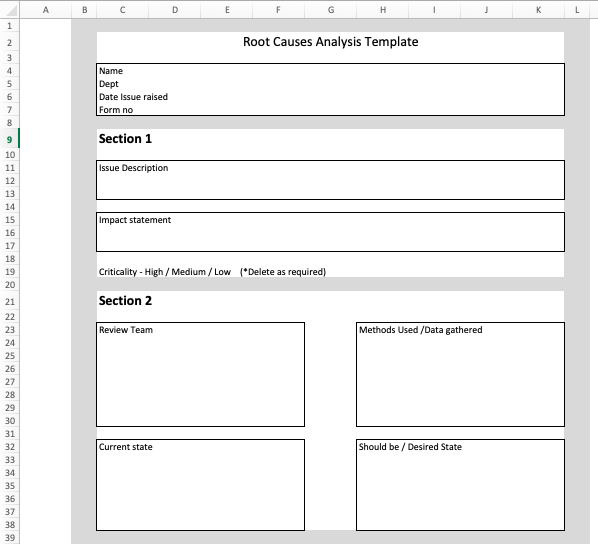
You can see our template below:

We’ve created multiple sections and boxed these elements to contain any user based text that gets added we’ve used merged cells to create a bigger space to capture this data – this has also helped us achieve a uniform shape/structure.
Let’s now cover each section in detail as to what it is and how we intend to use it.
1/ The Header
We want to capture the same basic information on each template that gets completed. This section enables the user to input information about the employee who used the form, their department, the date the form was created and a form number. We’ve used a form number as you may well want to record these (for future reference) in a log and capturing a unique number for the form will enable you to do that.
Section 1
2/ Issue Description
This box allows the user to enter, in their own terms, a description of the problem/issue being reviewed.
3/ Impact statement
This box allows the user to describe the impact of the problem being reported. Note we’ve kept this as a free text box but you could attempt to quantify it in some form of numerical format (i.e. lost sales value etc). We’ve chosen to include an impact statement as it helps anyone reviewing the form to understand what the net impact has been from the problem being reviewed which could be used to help prioritize resources.
4/ Criticality statement – akin to the impact statement we’ve asked the user to score the criticality of the problem being reported in terms of High/Medium or Low. Now I know this is open to user interpretation (everyone might use the term critical for example) but again this adds a simple method of prioritization when you’re faced with multiple issues being logged.
Section 2 –
In Section 2 we aim to do two things with the form
1/ Identify Who and How – by this we mean who were the team who gathered the data around the issue and how did they do it – this gives the reviewer of the form a level of confidence in the methods used
2/ Cells that capture the as-is & should be state – again this helps explain the impact of the issue.
Section 3
Section 3 utilizes the 5 why technique to drill into potential causes, we add to this by asking why wasn’t it detected and what is the name of the process that failed (if you have a business systems procedure number you could also use that). We ask this against each of the “why’s” to give us more detail than a typical 5 why and the best picture of what went wrong and to enable us to generate probable causes.
Section 4
Section 4 aims to take the data produced during the 5 why section and then looks at possible root causes and the probability of them being a true “root cause”. I like this structure because it asks the user to calculate the impact of their possible root cause and express it to the reader. Whilst we haven’t identified it on the form you could express this as text (High/Medium/Low) or a value e.g. 1-10.
Section 5
Section 5 looks for the author to confirm the root cause(s). We’ve left this to be entered within a free text area & to identify the next steps. Now depending on your process, this could be some form of Preventative recurrence activity, it could be driving an update to procedure etc. You could certainly add more structure around this box depending on your own processes within your company.
So that’s the basic template. It’s also worth considering what can go wrong with the process so that you use this information to make the template as robust as you can. So let’s take a look at that.
Problems with Root Cause Analysis
Here are our view on the 5 key problems with root cause analysis
1/ Issues are invariably complex and can have multiple inputs to failure
By its very name Root Cause points towards a singular cause, business problems are invariably complex and its quite possible to have various contributing factors joining together to form an issue. Teams have to be aware of the complex nature of problems and be mindful that there may be multiple reasons behind issues arising in their business. A failure to account for this may lead to ineffective containment/recovery actions being implemented.
2/ Root Cause methods can be questionable
Clearly, various methods used may determine differing root cause results. It’s important to utilize a tried and tested standardized method that works for your organization and to use this same method every time!
3/ Peer pressure from Leadership
I’ve seen this time and time again where leadership try and influence continuous improvement projects and attempt to blame a “convenient” cause (often someone else\s department) Avoiding this can be difficult, nay impossible at times (depending on the influence of the individuals concerned). The key thing is to make a play for the use of a bone fide process where the process drives the results not individuals.
4/ Process focuses on blame
Continuous improvement processes should not use blame as an objective. The key thing is to understand and then mitigate the cause. Where organizations utilize a blame culture people can be afraid of raising concerns about issues or being caught as being a cause and then punished. True improvement projects move past blame and look to improve processes failures.
5/ Team-based approach can skew results
Team dynamics can all too often have a big sway over the results. Typically dynamic individuals (those with the loudest voice) can influence the outcome of the process, in particular, vocalize their view of the root cause. The most important factor here is to drive the level of professionalism within the team, the members themselves need the relevant experience and expertise relating to the process together with the appropriate analytical methods that can be used.
Summary
So there you have it, how to create a root cause analysis template and some background around the process. We hope you found this useful. You can find some more great tips, tools and techniques in our Problem Solving Guide.
We’d love to hear your feedback so please feel free to use our comments section below or fire us a message on Twitter. Thanks again!!